Inhoudsopgave
Advertenties
Beschikbare talen
Beschikbare talen
Quick Links
Advertenties
Hoofdstukken
Inhoudsopgave

Gerelateerde Handleidingen voor Gaggia Milano GAGGIA CADORNA STYLE


Samenvatting van Inhoud voor Gaggia Milano GAGGIA CADORNA STYLE
- Pagina 1 ENGLISH NEDERLANDS POLSKI GAGGIA CADORNA STYLE / PLUS RI9600 (SUP049) / RI9601 (SUP049E), RI9602 (SUP049EW) Operating instructions Gebruiksaanwijzing Instrukcja obsługi 4219-465-06021 MAN. GAG. CADORNA STY_PLUS CMF STW EN-NL-PL Rev.00.indd 1 23/04/2021 09:53:25...
- Pagina 2 Control panel / Controlepaneel / Panel sterowania ESPRESSO COFFEE STEAM HOT WATER clean/setting ON/OFF my favourites HOME START/STOP Beverage menu / Menu dranken / Menu napojów Ristretto Coffee / Koffie / Kawa Coffee / Koffie / Kawa 30 ml Coffee / Koffie / Kawa 120 ml Espresso Americano Coffee / Koffie / Kawa 40 ml...
- Pagina 3 4219-465-06021 MAN. GAG. CADORNA STY_PLUS CMF STW EN-NL-PL Rev.00.indd 3 23/04/2021 09:53:28...
- Pagina 4 First installation / Eerste installatie / Pierwsza instalacja Welcome LANGUAGE LANGUAGE CECO SLOVENIJA SLOVENIJA LIETUVOS ENGLISH LIETUVOS ITALIANO ENGLISH ITALIANO DEUTSCH DEUTSCH FRANÇAIS FRANÇAIS ESPAÑOL ESPAÑOL PORTUGUÊS ON/OFF clean/setting START/STOP my favourites HOME ON/OFF clean/setting my favourites HOME START/STOP ON/OFF my favourites HOME clean/setting...
- Pagina 5 Congratulations on purchasing the Gaggia Cadorna! This easy-to-use machine guarantees excellent coffee drinks, every day. With its intuitive interface, you can choose from among 6 beverages, customise them and save them to the 4 available profiles, where they can be instantly brought up whenever you want.
-
Pagina 6: Inhoudsopgave
English Table of Contents Machine Overview (Fig.2) ..................................................................................................Classic pannarello version (Style RI9600 - Plus RI9601) ............................................................. Steam wand version (Plus RI9602) ........................................................................................Control Panel and Display ................................................................................................. Control panel overview (Fig. 1) ............................................................................................Multifunction buttons ..........................................................................................................First Installation ................................................................................................................... Manual rinse cycle ............................................................................................................ -
Pagina 7: Machine Overview (Fig.2)
English Machine Overview (Fig.2) Coffee bean container lid Drip tray grid Coffee bean container “Full drip tray” indicator Power cord socket Espresso tray (only for Cadorna Plus model) Water tank Power cord Pre-ground coffee compartment Lubricant Coffee grinder adjustment knob Pre-ground coffee measuring scoop Control panel Water hardness tester... -
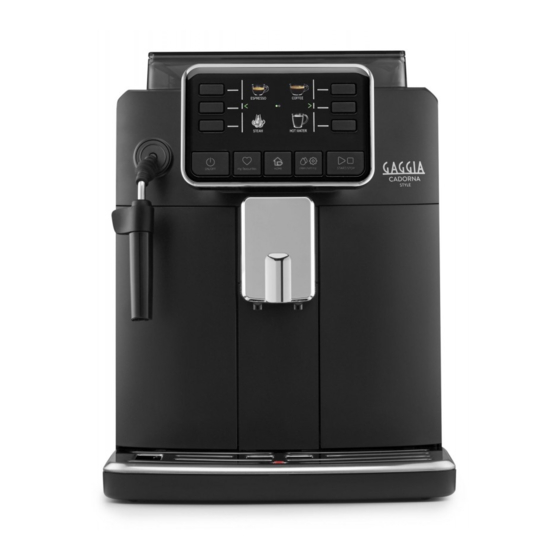
Pagina 8: Control Panel And Display
English Control Panel and Display This coffee machine features an easy-to-use, intuitive display. Please see below for an in-depth explanation of each button. Control panel overview (fig. 1) Selects the function shown on the display. 1/2 MULTIFUNCTION buttons To switch the machine on or off. ON/OFF button ON/OFF... -
Pagina 9: First Installation
English First Installation Before using the machine, it is essential to follow a few simple steps, clearly described in the explanatory drawings found in the quick guide at the beginning of this instruction manual. Note: To make the best-tasting coffee, you should brew 5 coffees initially to allow the machine to complete its self-adjustment. -
Pagina 10: Measuring Water Hardness
English Measuring water hardness You’ll need to set the water hardness when you instal your machine. Take the water hardness measuring strip that you find in the box and follow the steps shown on the display during installation. To adjust the water hardness setting later, press the CLEAN/SETTING button, select "... -
Pagina 11: Installing The Intenza+ Water Filter
English Installing the INTENZA+ water filter Remove the small white filter from the water tank and store it in a dry place. Immerse the INTENZA+ water filter vertically (with the opening pointing up) in cold water and gently press its sides to let any air bubbles out. Remove the INTENZA+ water filter from the water. -
Pagina 12: Types Of Beverage
English Types of Beverage Beverage name Description Ristretto A ristretto, served in a small cup, is an espresso whose brewing time is shorter than a regular espresso. As such, a ristretto is a shorter shot and lower in caffeine. Espresso The espresso is known around the globe as true "Italian coffee". -
Pagina 13: Brewing Coffee
English Brewing coffee Brewing coffee from whole coffee beans Warning: always use whole coffee beans when making espresso. Do not put any pre-ground, unroasted, freeze-dried or instant coffee in the coffee bean container, as they may damage the machine. Tip: Preheat the cups with hot water to enjoy a hotter coffee. Remove the espresso tray, place an espresso cup beneath the coffee dispensing spout, raising or lowering it according to the size of the cup being used. -
Pagina 14: How To Froth Milk
English 3 Press the " " button. COFFEE 30 ml Note: the "pre-ground coffee" function cannot dispense two cups of coffee at TEMP medium the same time, and it disables the aroma setting, both of which are possible with ESPRESSO coffee beans only. 4 Press the START/STOP button to start dispensing the coffee. -
Pagina 15: Steam Wand (Plus Ri9602)
English Steam wand (Plus RI9602) Fill 1/3 of a jug with milk. Press the HOME button to open the beverage menu. HOME 3 From the beverage selection menu, select " STEAM " and press the START/ STOP button to start frothing. ESPRESSO COFFEE START/STOP... -
Pagina 16: Dispensing Hot Water
English Dispensing Hot Water Warning: when the machine starts preparing hot water, the classic pannarello or steam wand (depending on the model) spout may spray steam and hot water. Place a container under the classic pannarello or steam wand (depending on the model). - Pagina 17 English Once the " COFFEE " button has been pressed, use the green " " and ESPRESSO " " buttons to select the desired amount. COFFEE Press " " to confirm and return to the previous screen, where the new 30 ml quantity will be displayed.
-
Pagina 18: Creating A Profile
English Creating a profile There are two ways to create a profile: Using the HOME button, as described in the "Beverage customisation" chapter, points 9 and 10; HOME Using the MY FAVOURITES button, as follows: my favourites Press the MY FAVOURITES button. -
Pagina 19: Coffee Grind Settings
English Coffee Grind Settings You can adjust the grind setting using the grinder adjustment knob on the coffee bean container. The ceramic coffee grinder guarantees perfect, even grinding for the preparation of every cup of coffee. The aroma is thus preserved, ensuring the perfect flavour every time. - Pagina 20 English Part description When to clean How to clean Brew group Weekly Remove the brew group and clean it under running water. Depending on usage See the "Cleaning and lubricating the brew group" chapter. Monthly Clean the brew group with the Gaggia coffee oil remover to remove any oily coffee residue Drip tray full When the red indicator emerges...
-
Pagina 21: Cleaning The Classic Pannarello (Style Ri9600 - Plus Ri9601)
English Cleaning the classic pannarello (Style RI9600 - Plus RI9601) Remove the classic pannarello and the rubber handle from the steam spout and rinse them under running water. Clean the steam wand with a damp cloth. Reassemble the parts. Cleaning the steam wand (Plus RI9602) Clean the steam wand with a damp cloth. -
Pagina 22: Cleaning The Brew Group
English Cleaning the brew group Warning: do not wash the brew group in the dishwasher and do not use dish- washing detergents, since they may cause the malfunctioning of the brew group and alter the coffee flavour. Removing the brew group Turn off the machine and disconnect the power cord. -
Pagina 23: Cleaning The Brew Group With Coffee Cleaning Tablets
English Cleaning the brew group with coffee cleaning tablets Warning: use only Gaggia tablets for removing oily coffee residue. Place a container under the coffee dispensing spout. Press the CLEAN/SETTING button and select the " CLEAN " button shown on the display. clean/setting Select "... -
Pagina 24: Lubricating The Brew Group
English If the hook is still in the lower position, this means it has not been correctly positioned. Reinsert the brew group in the machine along the side guides until it locks in the right position with a click. Warning: do not press the PUSH lever. Close the service door. -
Pagina 25: Descaling
English Apply a thin layer of lubricant to the guides, on both sides (see figure). Reinsert the brew group (see the "Reinserting the brew group" chapter). Note: you can use the lubricant tube multiple times. Descaling Descaling procedure Descaling needs to be carried out when the machine signals it. Use only the Gaggia descaling solution designed to guarantee the machine’s excellent performance. -
Pagina 26: What To Do If The Descaling Process Is Interrupted
English Empty the entire bottle of Gaggia descaling solution into the water tank and fill the tank with water up to the CALC CLEAN notch. Reinsert it in the machine. Place a large container (1.5l) under the steam tube and coffee dispenser. Follow the instructions shown on the display to launch the descaling procedure. -
Pagina 27: Various Settings
English Various Settings By pressing the CLEAN/SETTING button and selecting " SETTINGS " on the display, it is possible to reset or modify several machine parameters including: clean/setting Language Water filter Timer stand-by Water hardness Measurement units Beverage counter Restore factory settings Language When the language setting icon is selected, the list of available languages will be displayed. -
Pagina 28: Water Hardness
English Water hardness With " WATER HARDNESS " selected, follow the instructions on the display and those described under the "Measuring water hardness" chapter. Measurement units By selecting " MEASUREMENT UNITS ": LANGUAGE WATER FILTER it is possible to set the measurement units to "ml" or "oz". TIMER STAND-BY UNITS ON/OFF... -
Pagina 29: Error Code Key
English Error Code Key The list below reports the error codes that the display can show, their meanings and how to solve the problem. If the indicated solutions are ineffective because the display keeps showing the error code icon and the machine does not function correctly, or if further error codes are displayed, please contact an authorised service centre or your local vendor.. -
Pagina 30: Troubleshooting
English Troubleshooting This chapter summarises the most common problems you may encounter while using the machine. If you are unable to resolve the problem using the information given below, visit the FAQ sections on www.gaggia.com or www.gaggia.it or contact the Customer Service Centre in your country. Problem Cause Solution... - Pagina 31 English Problem Cause Solution The espresso does not The coffee grinder is set to a Adjust the coffee grinder to a finer setting. have enough crema or it coarse grinding. is watery. The machine is performing the self- Dispense several cups of coffee so that the adjustment.
-
Pagina 32: Gaggia Accessories
English GAGGIA Accessories Coffee and accessories are available through authorised centres (Italy), or distributors in your country. Descaling product INTENZA+ water filter Coffee oil remover Range of coffee available in beans and pre-ground: 100% Arabica / Intense / Decaffeinated 4219-465-06021 MAN. GAG. CADORNA STY_PLUS CMF STW EN-NL-PL Rev.00.indd 32 23/04/2021 09:54:04... -
Pagina 33: Technical Specifications
English Technical Specifications Nominal voltage - Power rating - See data plate on the inside of the Power supply service door Housing material Thermoplastic type Dimensions (Style) 260 x 345 x 440 mm Dimensions (Plus) 260 x 380 x 440 mm Weight (Style) 8.2 kg Weight (Plus) - Pagina 34 Nederlands Inhoudsopgave Overzicht van de machine (afb. 2) ..................................................................................Versie klassieke pannarello (Style RI9600 - Plus RI9601) ..........................................................Versie stoompijpje (Plus RI9602) ........................................................................................Bedieningspaneel en display ..........................................................................................Overzicht van het controlepaneel (afb. 1) ..............................................................................Multifunctietoetsen ..........................................................................................................Eerste installatie ..............................................................................................................Handmatige spoelcyclus ....................................................................................................
-
Pagina 35: Overzicht Van De Machine (Afb. 2)
Nederlands Overzicht van de machine (afb. 2) Deksel van het koffiebonenreservoir Deksel lekbakje Koffiebonenreservoir Indicator lekbakje vol Aansluiting voor voedingskabel Espresso tray (enkel voor het model Plus) Waterreservoir Voedingskabel Compartiment voorgemalen koffie Smeervet Regelknop van de koffiemolen Maatlepel voor voorgemalen koffie Controlepaneel Tester van de waterhardheid Afstelbare koffietuit... -
Pagina 36: Bedieningspaneel En Display
Nederlands Bedieningspaneel en display Deze koffiemachine heeft een intuïtief en gebruiksvriendelijk display. Lees de volgende paragrafen voor een beter begrip van de toetsen. Overzicht van het controlepaneel (afb. 1) Om de op het display aangegeven functie 1/2 MULTIFUNCTIETOETSEN te selecteren. Om de machine aan of uit te schakelen. -
Pagina 37: Eerste Installatie
Nederlands Eerste installatie Voordat u de machine gebruikt, is het van essentieel belang dat u een paar eenvoudige stappen volgt, duidelijk beschreven in de beknopte handleiding aan het begin van deze handleiding met verklarende tekeningen. Opmerking: om een nog heerlijkere koffie te verkrijgen, raden we u aan eerst 5 kopjes koffie te zetten zodat de machine de zelf-afstelling kan uitvoeren. -
Pagina 38: Meting Van De Waterhardheid
Nederlands Meting van de waterhardheid Tijdens de eerste installatie, moet de waterhardheid ingesteld worden. Neem het meetstrookje van de waterhardheid uit de verpakking en volg de stappen die op het display weergegeven worden tijdens de installatiefase. Om de waterhardheid later te veranderen, drukt u op de toets CLEAN/SETTING selecteert u "INSTELLINGEN"... -
Pagina 39: Installatie Van Het Waterfilter Intenza
Nederlands Installatie van het waterfilter INTENZA+ Verwijder het witte filtertje dat zich in het waterreservoir bevindt en bewaar het op een droge plaats. Dompel het waterfilter INTENZA+ verticaal (met de opening naar boven) in koud water en druk zachtjes op de zijkanten om de luchtbelletjes eruit te laten komen. Verwijder het INTENZA+ waterfilter uit het water en stel het in op basis van de gedetecteerde hardheid van het water (zie het hoofdstuk "Meting van de waterhardheid") en gespecificeerd aan de onderkant van het filter:... -
Pagina 40: Type Drank
Nederlands Type drank Naam van de drank Beschrijving Ristretto De ristretto, geserveerd in een klein kopje, is een espresso met een kortere afgiftetijd dan de klassieke espresso, wat resulteert in een kortere en minder cafeïnehoudende koffie. Espresso De espresso is in heel de wereld gekend als de echte "Italiaanse koffie". Hij wordt geserveerd in een klein kopje, met als onmiskenbare kenmerken een volledig en intens aroma en een toplaag van compacte, natuurlijke room. -
Pagina 41: Koffieafgifte
Nederlands Koffieafgifte Afgifte van koffie met koffiebonen Let op: gebruik enkel koffiebonen voor espresso. Plaats geen gemalen koffie, ongebrande koffie of oploskoffie in het koffiebonenreservoir, omdat deze de machine kunnen beschadigen. Raad: verwarm de kopjes voor met heet water om warme koffie te krijgen. Verwijder de espresso tray indien aanwezig, plaats een kopje onder de koffietuit, verplaats de koffietuit omhoog of omlaag, afhankelijk van het formaat van het gebruikte kopje. -
Pagina 42: Melk Opschuimen
Nederlands 3 Druk op de toets " ". COFFEE 30 ml Opmerking: de functie "voorgemalen koffie" sluit de mogelijkheid uit om twee TEMP medium kopjes koffie tegelijk te zetten en het aroma in te stellen, wat alleen mogelijk is met ESPRESSO koffiebonen. -
Pagina 43: Stoompijpje (Plus Ri9602)
Nederlands Stoompijpje (Plus RI9602) Vul een kan voor 1/3 met koude melk. Druk op de toets HOME om naar het drankenmenu te gaan. HOME 3 Selecteer de toets "STOOM" en druk op de toets START/STOP om het opschuimen van de melk te laten beginnen. START/STOP ESPRESSO COFFEE... -
Pagina 44: Afgifte Van Heet Water
Nederlands Afgifte van heet water Let op: bij het begin van de bereiding kan, afhankelijk van het model, de klassieke pannarello of het stoompijpje stoom en heet water spuiten. Plaats een houder onder de klassieke pannarello of het stoompijpje (al naargelang het model). - Pagina 45 Nederlands Na te toets " KOFFIE " ingedrukt te hebben, gebruikt u de groene ESPRESSO toetsen " " en " ", om het gewenste volume in te stellen. COFFEE Druk vervolgens op de toets " " om te bevestigen en terug te keren naar het 30 ml vorige scherm, waar de nieuwe ingestelde hoeveelheid weergegeven wordt.
-
Pagina 46: Een Nieuw Profiel Aanmaken
Nederlands Een nieuw profiel aanmaken Men kan op twee wijzen een profiel aanmaken: Met de toets HOME , zoals beschreven in het hoofdstuk "Aanpassing van de dranken" onder punt 9 en 10; HOME Met de toets MY FAVOURITES , als volgt: my favourites Druk op de toets MY FAVOURITES Kies de kleur van het profiel die u verkiest. -
Pagina 47: Instelling Van De Maalfijnheid
Nederlands Instelling van de maalfijnheid U kunt de maalfijnheid aanpassen met de instelknop voor de maalfijnheid die zich in het koffiebonenreservoir bevindt. De keramische koffiemolen garandeert een perfecte en homogene maling voor de bereiding van elk kopje koffie. Zo wordt het aroma bewaard, om altijd een perfecte smaak te garanderen. - Pagina 48 Nederlands Beschrijving deel Wanneer reinigen Hoe reinigen Stoompijpje Na gebruik Reinig het stoompijpje met een vochtige (Plus RI9602) doek. Voor een grondigere reiniging kunt u de spuitmond losschroeven en met stromend water spoelen. Zetgroep Wekelijks Verwijder de zetgroep en reinig hem onder stromend water.
-
Pagina 49: Reiniging Van De Klassieke Pannarello (Style Ri9600 - Plus Ri9601)
Nederlands Reiniging van de klassieke pannarello (Style RI9600 - Plus RI9601) Verwijder de klassieke pannarello en het handvat en spoel ze af onder stromend water. Reinig het stoompijpje met een vochtige doek. Assembleer alle delen opnieuw. Reiniging van het stoompijpje (Plus RI9602) Reinig het stoompijpje met een vochtige doek. -
Pagina 50: Reiniging Van De Zetgroep
Nederlands Reiniging van de zetgroep Let op: reinig de zetgroep niet in de vaatwasmachine en gebruik geen afwasmiddelen voor afwas- of reinigingsmiddelen, omdat dit de zetgroep kan beschadigen en de smaak van de koffie kan beïnvloeden. Verwijdering van de zetgroep Schakel de machine uit en koppel de voedingskabel los. -
Pagina 51: Reiniging Van De Zetgroep Met Tabletten Om De Olieachtige Resten Van De Koffie Te Verwijderen
Nederlands Reiniging van de zetgroep met tabletten om de olieachtige resten van de koffie te verwijderen Let op: Gebruik voor het schoonmaken alleen Gaggia-tabletten om olieachtige resten van de koffie te verwijderen. Plaats een houder onder de koffietuit. Druk op de toets CLEAN/SETTING en selecteer de toets "... -
Pagina 52: Invetten Van De Zetgroep
Nederlands Indien de haak nog onderaan is, betekent dit dat hij niet correct gepositioneerd is. Plaats de zetgroep opnieuw in de machine langs de geleiders aan de zijkanten totdat deze op zijn plaats blokkeert met een klik. Let op: druk niet op de hendel PUSH. Sluit de servicedeur Invetten van de zetgroep Voor optimale machineprestaties moet de zetgroep gesmeerd worden. -
Pagina 53: Ontkalking
Nederlands Breng een dunne laag smeervet aan op de geleiders, aan beide kanten (zie afbeelding). Plaats de zetgroep opnieuw (zie het hoofdstuk "Herplaatsing van de zetgroep"). Opmerking: u kunt de tube smeervet meerdere keren hergebruiken. Ontkalking Frequentie van de ontkalking Wanneer de machine dit vereist, moet de ontkalking van de machine uitgevoerd worden. -
Pagina 54: Wat Te Doen In Geval Van Onderbreking Van De Ontkalkingsprocedure
Nederlands Giet de hele fles ontkalkingsoplossing Gaggia in het waterreservoir en vul dit met water tot u het niveau van CALC CLEAN bereikt. Plaats het vervolgens weer in de machine. Plaats een grote houder (1,5l) onder het stoompijpje en de koffietuit. Volg de aanwijzingen die weergegeven worden op het display om de ontkalkingsprocedure te starten. -
Pagina 55: Verschillende Instellingen
Nederlands Verschillende instellingen Door op de toets CLEAN/SETTING te drukken en "INSTELLINGEN" op het display te selecteren, kunnen sommige machineparameters hersteld of gewijzigd clean/setting worden, zoals: Taal. Waterfilter. Timer stand-by. Waterhardheid. Meeteenheid. Drankenteller. Fabrieksinstellingen herstellen. Taal Nadat het pictogram voor de taalinstelling geselecteerd is, wordt de lijst met beschikbare talen geopend. -
Pagina 56: Waterhardheid
Nederlands Waterhardheid Nadat "WATERHARDHEID" geselecteerd is, volgt u de instructies op het display en wat beschreven is in het hoofdstuk "Meting van de waterhardheid". Meeteenheid Door "MEETEENHEID" te selecteren: LANGUAGE WATER FILTER kan men de meeteenheid instellen in "ml" of "once". TIMER STAND-BY UNITS ON/OFF... -
Pagina 57: Betekenis Van De Foutcodes
Nederlands Betekenis van de foutcodes Hieronder staan een aantal foutcodes die het display kan weergeven, hun betekenis en hoe het probleem op te lossen. Als de aangegeven oplossingen niet werken en het display het pictogram van de foutcode blijft weergeven en de machine niet correct werkt, of als er andere foutcodes worden weergegeven, moet u contact opnemen met een erkend servicecentrum of met de dealers. -
Pagina 58: Oplossing Van Problemen
Nederlands Oplossing van problemen Dit hoofdstuk vat de meest voorkomende problemen samen die u kunt aantreffen bij de machine. Als u het probleem niet kunt oplossen met de onderstaande informatie, ga dan naar www.gaggia.com of www.gaggia.it. voor een lijst met veelgestelde vragen of neem contact op met het Customer Service Center of de dealers in uw land. - Pagina 59 Nederlands Probleem Oorzaak Oplossing De zetgroep kan niet De zetgroep bevindt zich niet in de De zetgroep werd niet in positie geplaatst geplaatst worden. correcte positie. alvorens hij terug gepositioneerd werd. Zorg ervoor dat de hendel contact maakt met de basis van de zetgroep en dat de haak van de zetgroep in de juiste positie staat.
-
Pagina 60: Accessoires Gaggia
Nederlands Probleem Oorzaak Oplossing Het filter “INTENZA+” U moet de lucht uit het filter laten Laat de luchtbellen uit het filter komen. kan niet geplaatst gaan. worden. Het reservoir bevat nog water. Leeg het waterreservoir alvorens het filter te installeren. De rubberen afdichting is niet op Controleer de verpakking en plaats de het filter “INTENZA+”... -
Pagina 61: Technische Gegevens
Nederlands Technische gegevens Nominale spanning - Nominaal Zie plaatje aan de binnenkant van vermogen - Voeding de servicedeur Materiaal behuizing Thermoplast Afmetingen (Style) 260 x 345 x 440 mm Afmetingen (Plus) 260 x 380 x 440 mm Gewicht (Style) 8,2 kg Gewicht (Plus) 9 kg Kabellengte... - Pagina 62 Polski Spis treści Główne elementy urządzenia (Rys. 2) ............................................................................Wersja z przystawką pannarello (Style RI9600 - Plus RI9601) ....................................................Wersja z dyszą pary (Plus RI9602) ......................................................................................Panel sterowania i wyświetlacz ........................................................................................ Główne elementy panelu sterowania (rys. 1) ..........................................................................Przyciski wielofunkcyjne ....................................................................................................
-
Pagina 63: Główne Elementy Urządzenia (Rys. 2)
Polski Główne elementy urządzenia (Rys. 2) Pokrywka pojemnika na kawę ziarnistą Pokrywa tacy ociekowej Pojemnik na kawę ziarnistą Wskaźnik pełnej tacy ociekowej Gniazdo do kabla zasilającego Espresso tray (tylko w przypadku modelu Plus) Zbiornik na wodę Kabel zasilający Pojemnik na kawę wstępnie zmieloną Smar Pokrętło regulacji młynka Miarka do kawy wstępnie zmielonej... -
Pagina 64: Panel Sterowania I Wyświetlacz
Polski Panel sterowania i wyświetlacz Niniejszy ekspres do kawy posiada intuicyjny i łatwy w obsłudze wyświetlacz. Aby lepiej zapoznać się z poszczególnymi przyciskami, należy przeczytać poniższe paragrafy. Główne elementy panelu sterowania (rys. 1) Aby wybrać funkcję wskazaną na 1/2 Przyciski WIELOFUNKCYJNE wyświetlaczu. -
Pagina 65: Pierwsza Instalacja
Polski Pierwsza instalacja Przed użyciem urządzenia należy przestrzegać kilku prostych wskazówek wyraźnie opisanych w skróconej instrukcji na początku niniejszego podręcznika, gdzie zamieszczono ilustracje objaśniające. Ważne: aby kawa smakowała lepiej, zalecamy przygotowanie początkowo 5 filiżanek kawy, aby urządzenie wykonało automatyczną regulację. Uwaga: nie używać... -
Pagina 66: Pomiar Twardości Wody
Polski Pomiar twardości wody Podczas pierwszej instalacji należy ustawić twardość wody. Wyjąć z opakowania pasek testowy do pomiaru twardości wody i postępować zgodnie z instrukcjami widniejącymi na wyświetlaczu podczas fazy instalacji. Aby zmienić twardość wody w innym momencie, należy nacisnąć przycisk CLEAN/ SETTING , wybrać... -
Pagina 67: Instalacja Filtra Wody Intenza
Polski Instalacja filtra wody INTENZA+ Wyjąć mały biały filtr znajdujący się w zbiorniku na wodę. Przechowywać go w suchym miejscu. Zanurzyć filtr wody INTENZA+ w zimnej wodzie w pozycji pionowej (otworem ku górze) i nacisnąć delikatnie na brzegi, aby wypuścić pęcherzyki powietrza. Wyjąć... -
Pagina 68: Rodzaje Napojów
Polski Rodzaje napojów Nazwa napoju Opis Ristretto Mocna kawa, serwowana w małej filiżance, to espresso, którego czas dozowania jest krótszy w porównaniu z czasem dozowania klasycznego espresso, czego efektem jest kawa w mniejszej ilości i mniej bogata w kofeinę. Espresso Espresso znane jest na całym świecie jako prawdziwa „kawa we włoskim stylu”. -
Pagina 69: Parzenie Kawy
Polski Parzenie kawy Parzenie kawy na bazie kawy ziarnistej Uwaga: używać wyłącznie kawy ziarnistej do espresso. Nie wsypywać do pojemnika na kawę ziarnistą kawy mielonej, kawy niepalonej, kawy liofilizowanej lub rozpuszczalnej, ponieważ mogłyby one uszkodzić urządzenie. Wskazówka: aby kawa była cieplejsza, należy podgrzać filiżanki gorącą wodą. Wyjąć... -
Pagina 70: Spienianie Mleka
Polski 3 Nacisnąć przycisk „ ”. COFFEE 30 ml Ważne: funkcja „kawy wstępnie zmielonej” wyklucza możliwość parzenia dwóch TEMP medium filiżanek kawy równocześnie, a także ustawienia aromatu, co jest możliwe ESPRESSO wyłącznie w przypadku kawy ziarnistej. 4 Nacisnąć przycisk START/STOP , aby uruchomić parzenie kawy. START/STOP ON/OFF my favourites... -
Pagina 71: Dysza Pary (Plus Ri9602)
Polski Dysza pary (Plus RI9602) Wlać do dzbanka zimne mleko, do około 1/3 pojemności. Nacisnąć przycisk HOME aby wejść do menu napojów. HOME 3 Wybrać przycisk „PARA” i nacisnąć przycisk START/STOP aby rozpocząć spienianie mleka. START/STOP ESPRESSO COFFEE STEAM HOT WATER 4 Włożyć... -
Pagina 72: Nalewanie Gorącej Wody
Polski Nalewanie gorącej wody Uwaga: gdy rozpoczyna się przygotowanie, w zależności od modelu, z przystawki pannarello lub dyszy pary może pryskać para i gorąca woda. Ustawić pojemnik pod przystawką pannarello lub dyszą pary (w zależności od modelu). Nacisnąć przycisk HOME HOME Nacisnąć... - Pagina 73 Polski Po naciśnięciu przycisku „KAWA ” użyć zielonych przycisków „ ” i „ ”, ESPRESSO aby ustawić żądaną objętość. COFFEE Następnie nacisnąć przycisk „ ”, aby potwierdzić i powrócić do poprzedniego 30 ml ekranu, na którym będzie wyświetlana nowa ustawiona ilość. Nacisnąć...
-
Pagina 74: Tworzenie Profilu
Polski Tworzenie profilu Istnieją dwa sposoby na utworzenie profilu: Za pomocą przycisku HOME , jak opisano w rozdziale „Indywidualne ustawienia napojów”, w punktach 9 i 10; HOME Za pomocą przycisku MY FAVOURITES , w następujący sposób: my favourites Nacisnąć przycisk MY FAVOURITES Wybrać... -
Pagina 75: Regulacja Stopnia Mielenia
Polski Regulacja stopnia mielenia Stopień mielenia można regulować za pomocą pokrętła do regulacji stopnia mielenia w posta w pojemniku na kawę ziarnistą. Młynek ceramiczny zapewnia idealne i jednolite mielenie ziaren niezbędnych przy przygotowywaniu każdej filiżanki kawy. Zachowywany jest wówczas aromat, który zapewnia zawsze doskonały smak. - Pagina 76 Polski Opis części Kiedy czyścić Jak czyścić Dysza pary Po użyciu Wyczyścić dyszę pary za pomocą wilgotnej (Plus RI9602) ściereczki. W celu dokładniejszego oczyszczenia jej można odkręcić wylot i umyć go pod bieżącą wodą. Blok zaparzający Co tydzień Wyjąć blok zaparzający i umyć go pod bieżącą wodą.
-
Pagina 77: Czyszczenie Przystawki Pannarello (Style Ri9600 - Plus Ri9601)
Polski Czyszczenie przystawki pannarello (Style RI9600 - Plus RI9601) Wyjąć przystawkę pannarello oraz uchwyt i przepłukać je pod bieżącą wodą. Wyczyścić rurkę wylotu pary za pomocą miękkiej szmatki. Zmontować ze sobą wszystkie części. Czyszczenie dyszy pary (Plus RI9602) Wyczyścić dyszę pary za pomocą wilgotnej ściereczki. W celu dokładniejszego oczyszczenia jej można odkręcić... -
Pagina 78: Czyszczenie Bloku Zaparzającego
Polski Czyszczenie bloku zaparzającego Uwaga: nie myć bloku zaparzającego w zmywarce i nie używać płynów do mycia naczyń lub innych detergentów, ponieważ mogłyby one spowodować nieprawidłowe działanie bloku zaparzającego, co mogłoby być odczuwalne w smaku kawy. Wyjmowanie bloku zaparzającego Wyłączyć urządzenie i odłączyć kabel zasilający. Wyjąć... - Pagina 79 Polski Czyszczenie bloku zaparzającego za pomocą pastylek do usuwania oleistych pozostałości po kawie Uwaga: do czyszczenia stosować wyłącznie pastylki Gaggia do usuwania oleistych pozostałości po kawie. Umieścić pojemnik pod dozownikiem kawy. Nacisnąć przycisk CLEAN/SETTING i wybrać na wyświetlaczu przycisk „CZYSZCZENIE”. clean/setting Wybrać...
-
Pagina 80: Smarowanie Bloku Zaparzającego
Polski Jeśli zaczep jest nadal w pozycji dolnej, oznacza to, że nie jest on ustawiony prawidłowo. Włożyć blok zaparzający do urządzenia wzdłuż prowadnic umieszczonych po bokach, dopóki nie zostanie on zablokowany w pozycji, o czym będzie świadczyć kliknięcie. Uwaga: nie naciskać dźwigni PUSH. Zamknąć... -
Pagina 81: Odwapnianie
Polski Nanieść cienką warstwę smaru na prowadnice, po obu stronach (patrz rysunek). Włożyć blok zaparzający na miejsce (patrz rozdział „Wkładanie bloku zaparzającego na miejsce”). Ważne: tubki ze smarem można używać kilkukrotnie. Odwapnianie Procedura odwapniania Gdy wymaga tego urządzenie, należy wykonać jego odwapnienie. Stosować... -
Pagina 82: Co Robić W Przypadku Przerwania Procedury Odwapniania
Polski Wlać całą butelkę roztworu odwapniającego Gaggia do zbiornika na wodę, a następnie wypełnić go wodą aż do poziomu CALC CLEAN. Następnie włożyć go z powrotem do urządzenia. Umieścić duży pojemnik (1,5 l) pod rurką wylotu pary i dozownikiem kawy. Postępować... -
Pagina 83: Ustawienia Różne
Polski Ustawienia różne Naciskając przycisk CLEAN/SETTING i wybierając na wyświetlaczu „USTAWIENIA”, będzie można przywrócić lub zmienić niektóre parametry clean/setting urządzenia, między innymi: Język. Filtr wody. Timer stand-by. Twardość wody. Jednostki miary. Licznik napojów. Przywracanie ustawień fabrycznych. Język Po wybraniu ikony ustawiania języków otworzy się lista dostępnych języków. Dostępne języki WŁOSKI NIDERLANDZKI... -
Pagina 84: Twardość Wody
Polski Twardość wody Po wybraniu opcji „TWARDOŚĆ WODY” postępować zgodnie z instrukcjami na wyświetlaczu i z opisem w rozdziale „Pomiar twardości wody”. Jednostki miary Wybierając opcję „JEDNOSTKI MIARY”: LANGUAGE WATER FILTER można ustawić jednostkę miary w „ml” lub „uncjach”. TIMER STAND-BY UNITS ON/OFF my favourites... -
Pagina 85: Znaczenie Kodów Błędów
Polski Znaczenie kodów błędów Poniżej wymieniono niektóre kody błędów, jakie mogą się pojawiać na wyświetlaczu, ich znaczenie oraz instrukcje rozwiązania problemów. Jeśli wskazane rozwiązania okażą się nieskuteczne, ponieważ na wyświetlaczu nadal będzie wyświetlana ikona kodu błędu i urządzenie nie zacznie działać prawidłowo, lub gdyby pojawiły się... -
Pagina 86: Rozwiązywanie Problemów
Polski Rozwiązywanie problemów W niniejszym rozdziale podsumowano najczęstsze problemy, jakie mogą występować w tym urządzeniu. Jeśli problemu nie uda się rozwiązać, korzystając z podanych poniżej informacji, należy wejść na stronę www.gaggia.com lub www. gaggia.pl, aby zapoznać się z często zadawanymi pytaniami lub skontaktować się z Centrum obsługi klienta bądź... - Pagina 87 Polski Problem Przyczyna Rozwiązanie Nie można włożyć bloku Blok zaparzający znajduje się w Blok zaparzający nie został ustawiony zaparzającego. nieprawidłowym położeniu. prawidłowo na swoim miejscu. Upewnić się, że dźwignia styka się z podstawą bloku zaparzającego i że haczyk bloku zaparzającego znajduje się w prawidłowym położeniu.
-
Pagina 88: Akcesoria Gaggia
Polski Problem Przyczyna Rozwiązanie Nie da się włożyć filtra Należy usunąć powietrze z filtra. Poczekać, aż pęcherzyki powietrza wydostaną „INTENZA+”. się z filtra. Zbiornik zawiera jeszcze wodę. Opróżnić zbiornik na wodę przed zainstalowaniem filtra. Gumowa uszczelka jest nałożona Sprawdzić opakowanie i nałożyć uszczelkę na na filtr „INTENZA+”. -
Pagina 89: Dane Techniczne
Polski Dane techniczne Napięcie nominalne - Moc Patrz tabliczka umieszczona po nominalna - Zasilanie wewnętrznej stronie drzwiczek serwisowych Materiał obudowy Tworzywo termoplastyczne Wymiary (Style) 260 x 345 x 440 mm Wymiary (Plus) 260 x 380 x 440 mm Masa (Style) 8,2 kg Masa (Plus) 9 kg... - Pagina 90 GAGGIA S.p.A. reserves the right to make any necessary modification. GAGGIA S.p.a. behoudt zich het recht voor om alle wijzigingen die zij noodzakelijk acht aan te brengen. GAGGIA S.p.a. zastrzega sobie prawo do wprowadzania dowolnych zmian. GAGGIA S.p.A. Sede Amministrativa/Administrative Office Via Torretta, 240 40041 Gaggio Montano - Bologna - Italia +39 0534 771111 / Fax +39 0534 31025...