Inhoudsopgave
Advertenties
Beschikbare talen
Beschikbare talen
Quick Links
Libretto istruzioni per l'installazione e l'uso di cucine a gas, miste
IT
ed elettriche. Serie:
Instructions for use and maintenance of gas, gas-electric and
GB
electric cookers. Series:
Rukovodstvo po ustanovke i `kspluatacii gazovyx, kombiniro-
RU
vannyx i `lektriheskix plit. Serii%
√‰ËÁ›Â˜ ÁÈ· ÙË ¯Ú‹ÛË Î·È ÙË Û˘ÓÙ‹ÚËÛË ÎÔ˘˙ÈÓÒÓ ˘ÁÚ·ÂÚ›Ô˘,
GR
ËÏÂÎÙÚÈÎÒÓ Î·È ÌÈÎÙÒÓ. ªÔÓ٤Ϸ:
Notice d'installation et d'utilisation des cuisinières à gaz et mix-
FR
tes. Séries:
Handleiding voor installatie en gebruik van gas-, gemengde en
NL
elektrische fornuizen. Serie:
66 N
Advertenties
Hoofdstukken
Inhoudsopgave

Gerelateerde Handleidingen voor Bompani BO647JC/N

Samenvatting van Inhoud voor Bompani BO647JC/N
- Pagina 1 Libretto istruzioni per l'installazione e l'uso di cucine a gas, miste ed elettriche. Serie: Instructions for use and maintenance of gas, gas-electric and electric cookers. Series: Rukovodstvo po ustanovke i `kspluatacii gazovyx, kombiniro- vannyx i `lektriheskix plit. Serii% √‰ËÁ›Â˜ ÁÈ· ÙË ¯Ú‹ÛË Î·È ÙË Û˘ÓÙ‹ÚËÛË ÎÔ˘˙ÈÓÒÓ ˘ÁÚ·ÂÚ›Ô˘, ËÏÂÎÙÚÈÎÒÓ...
-
Pagina 2: Inhoudsopgave
Indice Introduzione Dati tecnici e caratteristiche ............3 - La nostra Società, nel ringraziarVi per aver scelto uno dei suoi Installazione ................4 - 5 qualificati prodotti, desidera vivamente che otteniate da questa Aerazione del locale ..............4 apparecchiatura le migliori prestazioni, giustamente auspicate Ubicazione ................ -
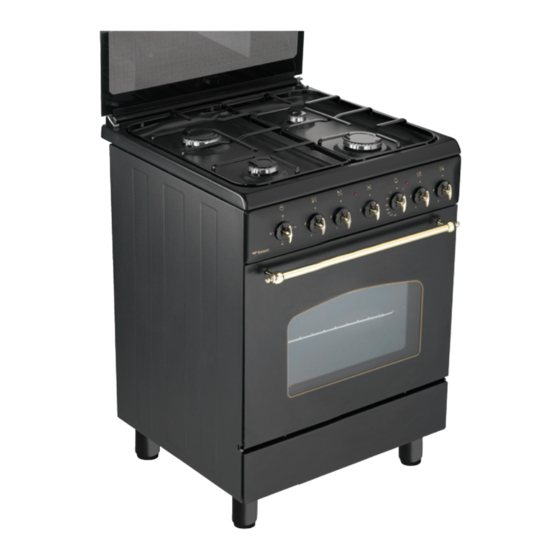
Pagina 3: Dati Tecnici E Caratteristiche
Dati e caratteristiche tecniche EQUIPAGGIAMENTO Dimensioni esterne nominali Cucine 60x60 Tutti i modelli sono dotati di dispositivo di sicurezza per bruciatori Altezza al piano di lavoro cm. 86,5 forno e grill. Altezza a coperchio alzato cm. 143 Secondo i modelli, le cucine possono avere inoltre: Profondità... -
Pagina 4: Installazione
Installazione - Il regolatore di pressione per GPL deve essere conforme a UNI INSTALLAZIONE 7432. L'installazione deve essere effettuata da persona qualificata che - Il raccordo della rampa è conforme a ISO 228-1. dovrà attenersi alle norme di installazione vigenti. - Evitare curve brusche nel tubo e tenerlo opportunamente scostato Prima dell'installazione assicurarsi che le condizioni di distribuzione da pareti calde. -
Pagina 5: Allacciamento Elettrico
Installazione - abbandonare la manopola in questa posizione ed accostare un alzandolo); fiammifero acceso al bruciatore: NON DEVE ACCENDERSI. - accendere il bruciatore del forno posizionando l’indice della ma- Tempo occorrente per eccitare il magnete durante l’accensione: nopola sulla posizione di "massimo"; 10 secondi circa. -
Pagina 6: Per L'utente
Per l'utente COME SI USA LA CUCINA gas, si consiglia di effettuare l'operazione con la manopola sulla posizione di "minimo" (fiamma piccola). AERAZIONE DEL LOCALE - Per le cucine munite di accensione elettrica ai bruciatori forno L'utilizzo di un apparecchio di cottura a gas porta alla produzione e grill, è... -
Pagina 7: Uso Grill A Gas O Elettrico
Per l'utente stato.Prima di introdurre le vivande da cuocere, si lasci riscaldare - con la manopola in posizione di "minimo" = 150°C il forno per 10 minuti almeno. - Tutte le altre temperature comprese fra 150°C ed 280°C si ricer- cano approssimativamente fra le posizioni di min. -
Pagina 8: Uso Del Girarrosto
Per l'utente posizionare la manopola del selettore sul tipo di cottura prescelto. - simbolo :accensione lampada forno e spia rossa, funziona- - Quando la manopola del programmatore si posizionerà sul simbolo mento della ventola. 0 la cottura sarà terminata. L’interruzione della cottura è automatica. - simbolo :cottura convenzionale forno “statico”, la tempe-... -
Pagina 9: Segnale Acustico
Per l'utente sulla posizione di spento. USO DEGLI ACCESSORI DEL FORNO CONTAMINUTI - La griglia del forno serve a supportare teglie di commercio per - Premere il tasto CONTAMINUTI e selezionare il tempo desiderato contenere dolci, arrosti o direttamente le carni da cuocere al grill. mediante il tasto "+"... -
Pagina 10: Pulizia Piano Cottura Vetroceramica
Per l'utente giarsi o rompersi. - L'urto violento con oggetti appuntiti o molto duri può danneggiarla. - Non urtare le parti smaltate e le candele di accensione (se vi - Se si riscontrano rotture, incrinature o crepe sulla, superficie si sono). -
Pagina 11: La Direttiva 2002/96/Ec (Raee)
Per l'utente LA DIRETTIVA 2002/96/EC (RAEE): INFORMAZIONI AGLI UTENTI Fig. A Questa nota informativa è rivolta esclusivamente ai possessori di apparecchi che presentano il simbolo di (Fig. A) nell’etichetta ade- siva riportante i dati tecnici, applicata sul prodotto stesso (etichetta matricolare): Questo simbolo indica che il prodotto è... - Pagina 12 Index Introduction Technical data and specifications ....... 13 - Thank you for choosing one of our quality products, capable of giving you the very best service. To make full use of its perfor- Installation ............. 14 - 15 mance features, read the parts of this manual which refer to your Ventilation ..............14 appliance carefully.
-
Pagina 13: Electric Hotplates
Technical data and specifications EQUIPMENT Nominal external dimensions Cookers 60x60 All models are equipped with safety device for oven and grill burn- Height at hob cm. 86,5 ers. Height with lid raised cm. 143 Depending on the models, cooker may also have: Depth with door closed cm. -
Pagina 14: Installation
Installation REPLACING THE HOB BURNER INJECTORS (Fig. 4) INSTALLATION - Remove the grid, the burner caps (A), and the burners (B); The appliance must be installed by qualified staff working in ac- - Unscrew and remove the injector in the bottom of each injector cordance with the regulations in force. -
Pagina 15: Electric Ignition
Installation For the user For direct connection to a power mains, a device that ensures HOW TO USE THE COOKER disconnection from the mains must be installed, with a opening distance for the contacts that allows for a complete disconnection VENTILATION under conditions of category III electrical overload, in conformity All gas cooking appliances produce heat and moisture in the rooms... -
Pagina 16: Using The Gas Hob
For the user ignition device malfunctions again, light the burner with a match The table below "Food to be grilled" will serve as a guide. and call the after-sales service. N.B.: the first time the grill is used smoke will come out of the oven. IMPORTANT: Before inserting foods for cooking, wait until any oil residues on the - Difficulty in igniting burners is normal if the cooker has been out... -
Pagina 17: Using The Multi-Function Electric Oven 6 Programs
For the user HOW TO USE THE ELECTRIC GRILL WITH ELECTRIC OVEN - symbol : oven lamp on (it will remain on even if the knob - For models with “ Electric Oven” only,controlled by two knobs pointer is turned to the other settings). separately (selector-thermostat), grilling is permitted with - symbol : operation of fan. -
Pagina 18: Removing The Oven Door
For the user - Press the button and within 5 seconds press "+" (fig. 16). END OF COOKING button until it shows 12.00. The symbol goes out but the - close the door some more and lift it off, holding it at the sides AUTO and moving it slightly forward;... -
Pagina 19: Cleaning Of The Ceramic Hob
For the user to remove deposits from hob burners and flame caps. Dry thor- Knob Cooking process oughly. setting - Never use abrasives to clean enamelled or chrome-plated 1 - 2 Keeping foods warm, bechamel sauce, custard parts. - Do not use too much water when washing the hob. Take care that 2 - 3 Reheating foods no water or other substances enter the burner housing holes, as... -
Pagina 20: European Directive 2002/96/Ec (Weee)
For the user EUROPEAN DIRECTIVE 2002/96/EC (WEEE): INFORMATION FOR THE CONSUMER Fig. A This information is strictly addressed to those who have a product showing the symbol below (Fig.A). This symbol is indicated on the technical data sticker (rating label) placed on the product itself. This symbol indicates that the appliance is considered as Waste Electrical and Electronic Equipment and complies with the European directive 2002/96/EC (WEEE). - Pagina 21 Soder'anie Vstuplenie Texniheskie dannye nogo povyweniq kahestva nawix izdelij, fabrika ostavlqet ixarakteristiki ................. 21 za soboj pravo vneseniq kakix-libo izmenenij da'e bez Ustanovka ................22 - 24 predvaritel;nogo predupre'deniq, hto, odnako, ne vyzyvaet Ventilqciq pome]eniq ............... 22 problem ili zatrudnenij pri `kspluatacii. Razme]enie ....................
-
Pagina 22: Texniheskie Dannye Ixarakteristiki
Texniheskie dannye i xarakteristiki RASPOLO"ENIE GORELOK NA RABOHEJ POVERXNOSTI smotri mo- GAZOVYE GORELKI ('iklery i mo]nosti) deli na risunke 1 v konce nastoq]ego rukovodstva. Tip gorelki In'ektor Umen;wennaq Nomin mo]nost; gaza mo]nost; SXEMU PODKL{HENIQ K ~LEKTROSETI smotri na risunke 2 v (kVt) (kVt) konce nastoq]ego rukovodstva. -
Pagina 23: Nastrojka Na Razlihnye Tipy Gaza
USTANOVKA - Ispol;zovat; tol;ko standartnye gibkie metalliheskie truby - Ohen; medlenno zakrutite regulirovohnyj vint, ne na'imaq na otvertku, do tex por, poka plamq ne umen;witsq na 3#4. Pri ili rezinovye wlangi. `tom obratite osoboe vnimanie na to, htoby plamq bylo do- - Regulqtor davleniq dol'en sootvetstvovat;... -
Pagina 24: Informaciq Dlq Potrebitelej
USTANOVKA INFORMACIQ DLQ POTREBITELEJ VKL{HENIE GORELKI DUXOVKI - iskrovoj razrqd uxodit v zeml[ (v drugix hastqx plity). - Otkrojte dvercu duxovki - povre'den generator ili mikrovykl[hatel;. - Na'mite na ruhku i povernite ee protiv hasovoj strelki do - skoplenie vozduxa v truboprovodax (osobenno posle polo'eniq maksimal;nogo plameni. -
Pagina 25: Ispol;Zovanie Gazovyx Gorelok Rabohej Poverxnosti Plity 25 Ispol;Zovanie `Lektriheskix Konforok
INFORMACIQ DLQ POTREBITELEJ kastr[li. Rekomenduetsq% Prigotovlqemoe na grile bl[do Vremq v minutax - dlq maloj gorelki ispol;zovat; kastr[li diametrom 8 1 storona 2 storona sm, ustanavlivaq postavlqemu[ vmeste s plitoj setku dlq umen;weniq diametra gorelki. Tonkie kuski mqsa - dlq srednej gorelki ispol;zovat; kastr[li diametrom 14 Dostatohno tolstye kuski mqsa - dlq bystroj gorelki ili t ÓÈ̇fl... -
Pagina 26: Ispol;Zovanie Kombinirovannoj Ispol;Zovanie Polifunkcional;Noj `Lektriheskoj Duxovki
INFORMACIQ DLQ POTREBITELEJ ·ÚȘ ËÁ¤˜ ı¤ÚÌ·ÓÛ˘: ruhku po hasovoj strelke mo'no ustanovit; ee v sledu[]ie ·) ∂Í·Ó·ÁηṲ̂ÓË Î˘ÎÏÔÊÔÚ›· Ù˘ ıÂÚÌfiÙËÙ·˜ (·ÂÚÈ˙fiÌÂÓÔ˜ polo'eniq% ÊÔ‡ÚÓÔ˜) - Simvol % vkl[henie lampohki duxovki (lampohka ‚) º˘ÛÈ΋ ΢ÎÏÔÊÔÚ›· Ù˘ ıÂÚÌfiÙËÙ·˜ (ÛÙ·ÙÈÎfi˜ ÊÔ‡ÚÓÔ˜) vkl[haetsq kogda ukazatel; regulqtora ustanovlen v l[bom Á) À¤Ú˘ıÚ˜... -
Pagina 27: Ispol;Zovanie Programmiru[]Ego Ustrojstva S Cifrovymi Hasami
INFORMACIQ DLQ POTREBITELEJ ustanovlennogo vremeni vy uslywite zvonok, izve]a[]ij ob simvol KASTR{LQ AUTO okonhanii prigotovleniq. - Po istehenii vremeni prigotovleniq (v 12 hasov) nadpis; zamigaet i simvol pogasnet. Zvonok izvestit vas ob KASTR{LQ ISPOL:ZOVANIE PROGRAMMIRU{}EGO USTROJSTVA BEZ HASOV okonhanii ustanovlennoj programmy. Dlq vykl[heniq zvonka (ris. -
Pagina 28: Informaciq Dlq Potrebitelej
INFORMACIQ DLQ POTREBITELEJ - продолжайте закрывать дверцу, после чего поднимите ее, взявшись ÍÓÌÙÓ͇ı ÏÓÊÌÓ Ì‡˜‡Ú¸ ÔË„ÓÚÓ‚ÎÂÌËfl ̇ χÍÒËχθÌÓÈ за бока, и слегка сместите вперед. После этого дверцу можно будет ÓÚÏÂÚÍ 6, ÔÓÒΠ˜Â„Ó ÒÌÓ‚‡ ÛÒÚ‡ÌÓ‚ËÚ¸ Û˜ÍÛ ‚ ‚˚·‡ÌÌÓ ‰Îfl легко снять. ÔË„ÓÚÓ‚ÎÂÌËfl... -
Pagina 29: Rekomendacii Po Texnike Bezopasnosti
INFORMACIQ DLQ POTREBITELEJ ÖÒÎË ÔÓ·ÎÂχ Ì ÛÒÚ‡ÌflÂÚÒfl, ‚˚ÁÓ‚ËÚ ͂‡ÎËÙˈËÓ‚‡ÌÌÓ„Ó OB}IE REKOMENDACII I PREDUPRE"DENIQ PO TEXNIKE BEZOPA- Ë ÛÔÓÎÌÓÏÓ˜ÂÌÌÓ„Ó ÒÔˆˇÎËÒÚ‡, ÍÓÚÓ˚È ÏÓÊÂÚ ÛÒÚ‡ÌËÚ¸ SNOSTI I UXODU ZA PLITOJ ÌÂËÒÔ‡‚ÌÓÒÚ¸. - Данный прибор не предназначен для использования людьми с ограниченными физическими или двигательными способностями ÖÒÎË... - Pagina 30 ¶ÂÚȯfiÌÂÓ· ∂ÈÛ·ÁˆÁË ∆¯ÓÈο ¯·Ú·ÎÙËÚÈÛÙÈο ............31 - ∏ ÂÙ·ÈÚ›· Ì·˜, ¢¯·ÚÈÛÙÒÓÙ·˜ Û·˜ Ô˘ ‰È·Ï¤Í·Ù ¤Ó· ·fi Ù· ∂ÁηٿÛÙ·ÛË ..............32 - 33 ¿ÚÈÛÙ· ÚÔ˚fiÓÙ· Ì·˜, ı¤ÏÂÈ Ó· ¤¯ÂÙ ·fi ·˘Ù‹ ÙË Û˘Û΢‹ ÙËÓ ∞∂ƒπ™ª√™ ∆√À Ãøƒ√À ............32 ηχÙÂÚË ·fi‰ÔÛË, fiˆ˜ ÛˆÛÙ¿ ··ÈÙ›Ù Ì ·˘Ù‹ ÙËÓ ·ÁÔÚ¿ ∆√¶√£∂∆∏™∏...
-
Pagina 31: ¯óèî¿ ¯·Ú·îùëúèûùèî
∆¯ÓÈο ¯·Ú·ÎÙËÚÈÛÙÈο ∂•√¶§π™ª√™ ∂͈ÙÂÚÈΤ˜ ‰È·ÛÙ¿ÛÂȘ ∫Ô˘˙›Ó˜ 60x60 √Ï· Ù· ÌÔÓ٤Ϸ Â›Ó·È ÂÊԉȷṲ̂ӷ Ì ‰È¿Ù·ÍË ·ÛÊ·Ï›·˜ ÁÈ· À„Ô˜ ¤ˆ˜ ÙȘ ÂÛٛ˜ cm. 86,5 η˘ÛÙ‹Ú˜, ÊÔ‡ÚÓÔ Î·È grill. À„Ô˜ Ì ÙÔ Î·¿ÎÈ ÛËΈ̤ÓÔ cm. 143 ∞Ó¿ÏÔÁ· Ì ٷ ÌÔÓ٤Ϸ ÔÈ ÎÔ˘˙›Ó˜ ÌÔÚÔ‡Ó Â›Û˘ Ó· ¤¯Ô˘Ó: µ¿ıÔ˜... -
Pagina 32: Áî·ù¿Ûù·ûë
∂ÁηٿÛÙ·ÛË ∂°∫∞∆∞™∆∞™∏ - •Â‚ȉÒÛÙÂ Î·È ‚Á¿ÏÙ ÙÔ Ì¤Î Ô˘ ‚Ú›ÛÎÂÙ·È ÛÙÔ Î¿Ùˆ ̤ÚÔ˜ ∏ ÂÁηٿÛÙ·ÛË Ú¤ÂÈ Ó· Á›ÓÂÈ ·fi ÂÍÂȉÈÎÂ˘Ì¤ÓÔ ¿ÙÔÌÔ Ô˘ οı ‚¿Û˘ ̤Π(C). Ú¤ÂÈ Ó· ÙËÚ‹ÛÂÈ ÙÔ˘˜ ÈÛ¯‡ÔÓÙ˜ ηÓÔÓÈÛÌÔ‡˜ ÂÁηٿÛÙ·Û˘. - ∆ÔÔıÂÙ‹ÛÙ ͷӿ ÙÔ˘˜ η˘ÛÙ‹Ú˜, Ù· ηχÌÌ·Ù· ÂÎÙÚÔ‹˜ ¶ÚÈÓ... -
Pagina 33: Π∞ ∫√À∑Π¡∂™ Me ∏§∂∫∆Ƒπ∫∏ ∞¡∞º
°È· ÙÔ ¯Ú‹ÛÙË ∂ÁηٿÛÙ·ÛË ¯ÚËÛÈÌÔÔÈËı› ηÏÒ‰ÈÔ Ù‡Ô˘ H05RR-F ‹ H05V2V2-F Ã∏™∏ ∆∏™ ∫√À∑π¡∞™ ηٿÏÏËÏ˘ ‰È·ÙÔÌ‹˜ (‚Ϥ ‰È·ÁÚ¿ÌÌ·Ù· ÛÙËÓ ÂÈÎ. 2). - Û ÂÚ›ÙˆÛË Ô˘ Ë Û˘Û΢‹ ¯ÔÚËÁÂ›Ù·È ¯ˆÚ›˜ ηÏÒ‰ÈÔ, ∞∂ƒπ™ª√™ ∆√À Ãøƒ√À ¯ÚËÛÈÌÔÔÈ‹ÛÙ ηÏÒ‰ÈÔ Ù‡Ô˘ H05RR-F ‹ H05V2V2-F ∏ ¯Ú‹ÛË ÌÈ·˜ Û˘Û΢‹˜ Ì·ÁÂÈڤ̷ÙÔ˜ Ì ˘ÁÚ·¤ÚÈÔ ·Ú¿ÁÂÈ Î·Ù¿ÏÏËÏ˘... -
Pagina 34: Ø™ Ã∏™Πª√¶√Π∂Π∆∞Π ∆√ ∏§∂∫∆Ƒπ∫√
°È· ÙÔ ¯Ú‹ÛÙË °IA KOYZINE™ ª∂ ∏§∂∫∆ƒπ∫∏ ∞¡∞º§∂•∏ ¶ø™ Ã∏™πª√¶√π∂π∆∞π √ º√Àƒ¡√™ À°ƒ∞∂ƒπ√À πÛ¯‡Ô˘Ó Ï‹Úˆ˜ Ù· ·Ú·¿Óˆ, Ì ‰È·ÊÔÚ¿ fiÙÈ Ë ¯Ú‹ÛË - ∞ÊÔ‡ ·Ó¿„ÂÙ ÙÔÓ Î·˘ÛÙ‹Ú·, ·Ê‹ÛÙ ÙÔ ÊÔ‡ÚÓÔ Ó· ˙ÂÛÙ·ı› ÙÔ˘ Û›ÚÙÔ˘ ¤¯ÂÈ ·ÓÙÈηٷÛÙ·ı› ·fi ¤Ó·Ó ÛÈÓı‹Ú· Ô˘ ÁÈ·... -
Pagina 35: Ƒπ∫√™ º√Yƒ¡√™ ¶√§§∞¶§Ø¡ §∂Π∆√Àƒ°Πø¡ 4
°È· ÙÔ ¯Ú‹ÛÙË επίπεδα, η θερμοκρασία του φούρνου ρυθμίζεται από το ∫ڷٿ٠̷ÎÚÈ¿ Ù· ·È‰È¿. διακόπτη του θερμοστάτη. ∏ ·ÓÙ›ÛÙ·ÛË ÙÔ˘ grill, Ô˘ ‚Ú›ÛÎÂÙ·È ÛÙÔ ¿Óˆ ̤ÚÔ˜ ÙÔ˘ ÊÔ‡ÚÓÔ˘, ·Ó¿‚ÂÈ Á˘Ú›˙ÔÓÙ·˜ ÙÔ ‰È·ÎfiÙË ÙÔ˘ ıÂÚÌÔÛÙ¿ÙË ÚÔ˜ Ù· ‰ÂÍÈ¿ - σύμβολο :άναμμα... -
Pagina 36: Ø™ Ã∏™Πª√¶√Π∂Π∆∞Π √ Ã√¡√¢Π
°È· ÙÔ ¯Ú‹ÛÙË - ∞˜ οÓÔ˘Ì ¤Ó· ·Ú¿‰ÂÈÁÌ·: ∏ ÒÚ· Â›Ó·È 9.25. ∂Èı˘Ì›Ù ӷ - µ¿ÏÙ ÙË Ì‡ÙË Ù˘ ÛÔ‡‚Ï·˜ ÛÙÔÓ ÔÌÊ·Ïfi ÙÔ˘ ÌÔÙ¤Ú. Ì› Ô ÊÔ‡ÚÓÔ˜ Û ÏÂÈÙÔ˘ÚÁ›· ÛÙȘ 11.00 Î·È Ó· ÙÂÏÂÈÒÛÂÈ ÙÔ - ∞Ê·ÈÚ¤ÛÙ ÙË Ï·‚‹ Ù˘ ÛÔ‡‚Ï·˜. Ì·Á›ÚÂÌ·... -
Pagina 37: Για Να Αφαιρεσετε Την Πορτα Του Φουρνου
°È· ÙÔ ¯Ú‹ÛÙË - ªÔÚ›Ù ӷ ·Î˘ÚÒÛÂÙ ¤Ó· ÚfiÁÚ·ÌÌ· ·ÙÒÓÙ·˜ ÙÔ Ï‹ÎÙÚÔ ‰ÂÓ Î·Ù¤‚ÂÈ Î¿Ùˆ ·fi ÙÔ˘˜ 60ÆC ÂÚ›Ô˘. ¢IAPKEIA æH™IMATO™ Î·È ÛÙË Û˘Ó¤¯ÂÈ· ÙÔ ÎÔÌ‚›Ô “-” ̤¯ÚÈ Ó· √È Ù¤ÛÛÂÚȘ ˙ÒÓ˜ Ì·ÁÂÈڤ̷ÙÔ˜ ηıÔÚ›˙ÔÓÙ·È ·fi Ù· ÂÌÊ·ÓÈÛÙ› ÛÙËÓ ÔıfiÓË Ë ¤Ó‰ÂÈÍË 0.00. ÂÚÈÁÚ¿ÌÌ·Ù·... -
Pagina 38: Àªµ√À§∂™ ∫∞Π ¶Ƒ√∂Π¢√¶√Π∏™∂Π™ °∂¡Π∫√À Ã∞Ƒ∞∫∆∏Ƒ
°È· ÙÔ ¯Ú‹ÛÙË - Ë ÁÂÓÈ΋ ÂÓ‰ÂÈÎÙÈ΋ Ï˘¯Ó›· ÏÂÈÙÔ˘ÚÁ›·˜ Â›Ó·È ·Ó·Ì̤ÓË. Ù· ·Ê·ÈÚ¤ÛÂÙ ·Ì¤Ûˆ˜ ÚÈÓ Î·Ú·ÌÂÏÔÔÈËıÔ‡Ó ¿Óˆ ÛÙÔ ÎÚ‡ÛÙ·ÏÏÔ. ∞Ó ÙÔ Úfi‚ÏËÌ· Û˘Ó¯ÈÛÙ›, Û˘Ì‚Ô˘Ï¢Ù›Ù ¤Ó·Ó ¤ÌÂÈÚÔ Î·È ªÂ ÙÔÓ ›‰ÈÔ ÙÚfiÔ ¯ÚÂÈ¿˙ÂÙ·È Ó· ·Ê·ÈÚ¤ÛÂÙ ·Ì¤Ûˆ˜ οı ˘fiÏÂÈÌÌ· ÂÍÔ˘ÛÈÔ‰ÔÙË̤ÓÔ Ù¯ÓÈÎfi, Ô˘ Ó· Â›Ó·È Û ı¤ÛË Ó· ÂÈÛ΢¿ÛÂÈ ÙË ·fi... - Pagina 39 Introduction Index Données et caractéristiques .........40 - Nous vous remercions d'avoir choisi un appareil de notre mar- que. Veuillez lire attentivement cette notice pour bénéficier des Installation ............. 41 - 42 performances que vous êtes en droit d'en attendre. Notre Société Aération des locaux .............
-
Pagina 40: Données Et Caractéristiques
Données et caractéristiques techniques EQUIPEMENT Dimensions extérieures nominales Cuisinière 60x60 Tous les modèles sont équipés de dispositifs de sécurité pour les Hauteur (table de travail) cm. 86,5 brûleurs du four et du grilloir. Hauteur (couvercle ouvert) cm. 143 Suivant les modèles, les cuisinières peuvent avoir en plus: Profondeur (porte fermée) cm. -
Pagina 41: Installation
Installation INSTALLATION - Le tube en caoutchouc ne doit pas être replié et doit être éloigné L’installation de l’appareil doit être effectuée par un professionnel des parois chaudes. qualifié conformément aux textes réglementaires et règles de l’art - Référence aux règles d'installation pour le raccordement en gaz en vigueur. -
Pagina 42: Branchement Électrique
Installation REGLAGE DU RALENTI DU BRÛLEUR DU FOUR fermeture ( Si la cuisinière doit fonctionner au gaz liquide (B/P), il suffit que le - après 90 secondes pour les brûleurs de la table, 60 secondes by-pass soit vissé complètement. pour les brûleurs du four ou grilloir, amener l’index de la manette Au contraire, si la cuisinière doit fonctionner au gaz naturel, il faut sur la position "ouvert";... -
Pagina 43: Pour L'utilisateur
Pour l'utilisateur UTILISATION DE LA CUISINIERE - Pour les cuisinières équipées de dispositif d'allumage électrique des brûleurs du four et grilloir, il faut absolument allumer ces AERATION DES LOCAUX brûleurs avec la porte du four complètement ouverte; L'utilisation d'un appareil de cuisson au gaz conduit à la production - Pendant l'allumage des brûleurs de four et grilloir qui sont équipés de chaleur et d'humidité... -
Pagina 44: Grilloir À Gaz Ou Électrique
Pour l'utilisateur FOUR ÉLECTRIQUE STATIQUE " 4 New" UTILISATION DU GRILLOIR A GAZ Grâce aux différents éléments chauffants, commandés par un - Placer la protection manettes (voir fig. 11); sélecteur et reglés par un thermostat, partant de la position 0 (fermé) - allumer le brûleur et attendre quelques minutes afin que le brûleur et en tournant la manette dans le sens des aiguilles d’une montre, se réchauffe;... -
Pagina 45: Utilisation Du Tournebroche
Pour l'utilisateur - Choisir la température en utilisant la manette du thermostat - repère :allumage ampoule du four et voyant rouge, fonction- et positionner la manette du sélecteur sur le type de cuisson nement de la turbine. choisi. - repère :cuisson conventionnelle du four “statique”, la tempéra- - Quand la manette du programmateur se positionnera sur le ture du four est réglée au moyen de la manette du thermostat. -
Pagina 46: Comment Enlever La Porte Du Four
Pour l'utilisateur et le sélecteur sur le type de cuisson présélectionné; le témoin manette sur la position "maximum". Le temps nécessaire pour rouge s’allume, I’éclairage du four s’allume et le four commence cette opération de nettoyage dépend du degré de salissures du à... -
Pagina 47: Nettoyage Table De Cuisson En Vitroceramique
Pour l'utilisateur colliers de serrage normalisés; Position Type de cuisson - si les robinets deviennent anormalement durs, contacter le manette S.A.V.; 1 - 2 Tenue à chaud, béchamel, crème - les parties émaillées ou chromées se nettoient avec de l’eau sa- vonneuse tiède ou des détersifs non abrasifs. -
Pagina 48: La Directive 2002/96/Ec (Deee)
Pour l'utilisateur LA DIRECTIVE 2002/96/EC (DEEE): INFORMATIONS POUR L’UTILISATEUR. Fig. A Ces informations s’adressent exclusivement aux utilisateurs pos- sédant un produit sur lequel figure le symbole ci-dessous (Fig. A). Ce symbole est reporté sur l’étichette des caractéristiques tech- niques de l’appareil (plaque ségnalétique) : Ce symbole indique que cet appareil est classé, selon les normes en vigueur, comme un équipement électrique ou électronique et qu’il est conforme à... -
Pagina 49: Inleiding
Inhoud Inleiding Technische gegevens en kenmerken ....50 - Wij willen U danken voor het kiezen van één van de kwaliteits- produkten van ons bedrijf en het is onze nadrukkelijke wens Installatie ............51 - 52 dat dit apparaat zal beantwoorden aan de hoge eisen die U er Ventilatie van de ruimte .......... -
Pagina 50: Elektrische Plaatjes
Technische gegevens en kenmerken TOEBEHOREN Nominale buitenafmetigen Fornuizen 60x60 Alle modellen zijn uitgerust met een branderbeveiliging voor zowel Hoogte bij het werkblad cm. 86,5 de oven als de grill. Hoogte met geopend deksel cm. 143 Afhankelijk van de modellen kunnen de fornuizen verder zijn Diepte bij gesloten deur cm. -
Pagina 51: Ventilatie Van De Ruimte
Installatie INSTALLATIE - Knikken in de slang voorkomen en een gepaste afstand ten De installatie moet worden uitgevoerd door een deskundige, die opzichte van de warme wanden in acht nemen. zich aan de geldende normen dient te houden. - Verwijzingen naar de installatie-voorwaarden voor de aansluiting Vóór de installatie controleren of de karakteristieken van het lokale van het apparaat op het gas: gas-distributienet (aard en druk van het gas) overeenstemmen met... -
Pagina 52: Aansluiting Op Het Elektriciteitstnet
Installatie AFSTELLING VAN HET "MINIMUM" VAN DE BRANDER VAN DE BEVEILIGINGSINRICHTING DE OVEN De juiste afstand tussen het uiteinde van het gevoelige element van Als het fornuis op vloeibaar gas moet functioneren (B/P), moet de het warmtekoppel en de brander is aangegeven in de figuren 5a,5b. by-pass van de kraantjes volledig dicht worden gedraaid. -
Pagina 53: Voor De Gebruiker
Voor de gebruiker GEBRUIK VAN HET FORNUIS vervangen door een vonk die wordt verkregen door (ook meerdere malen) op de knop te drukken die zich op VENTILATIE VAN DE RUIMTE het bedieningspaneel bevindt, of door op de knop van de brander Het gebruik van een apparaat voor het koken op gas zal leiden tot te drukken die moet worden aangestoken. -
Pagina 54: Gebruik Van De Gasoven
Voor de gebruiker ELEKTRISCHE MULTIFUNCTIEOVEN OVEN 4 GEBRUIK VAN DE GASOVEN Dankzij de verschillende, door een enkele knop bediende en door - Na de brander te hebben ontstoken de oven gedurende 10 minuten een thermostaat gecontroleerde warmte-elementen, vanuit de laten verwarmen; stand 0 (uit) en door de knop rechtsom te draaien, worden de - de te koken levensmiddelen in een normale volgende standen verkregen:... -
Pagina 55: Het Gebruik Van De Elektrische Grill Met De Elektrische Oven
Voor de gebruiker HET GEBRUIK VAN HET DRAAISPIT - Symbool :ontsteking ovenlamp en rode controlelampje, we- a) Bij het roosteren met geopende deur. rking van de ventilator. - Plaats de knoppenbescherming zoals getoond in afbeelding 12; - Symbool :conventionele kookmethode, “statische” oven, de - rijg het te braden vlees op de spies en zet het in het midden vast temperatuur van de oven wordt met behulp van de thermostaatknop met behulp van de twee grote vorkklemmen;... -
Pagina 56: De Ovendeur Verwijderen
Voor de gebruiker AUTOMATISCH FUNCTIONERING MET INSTELLING KOOKTIJD op de juiste wijze te herhalen. EN EINDE KOOKTIJD ANNULERING VAN EEN PROGRAMMA - Bijvoorbeeld: het is 9.25; we willen dat de oven om 11.00 aangaat - Een programma kan worden verwijderd door op de toets DUUR en dat het koken om 12.00 stopt (kooktijd 1 uur). -
Pagina 57: Schoonmaken Van De Glaskeramische Kookplaat
Voor de gebruiker op het glas karameliseren. Hetzelfde geldt voor resten aluminiumfo- De vier kookzones zijn door op de plaat geëtste omtrekken af- lie of voorwerpen van plastic die door onoplettendheid op de nog gebakend. Voor een goed rendement en een overeenkomstig warme zone waren geplaatst. -
Pagina 58: De Richtlijn 2002/96/Eg (Aeea)
Voor de gebruiker van stoten, breuken of scheuren vertoont, wordt het aangeraden deelneming in een collectief systeem voldoen aan hun verant- het apparaat niet meer te gebruiken, de elektrische voeding los woordelijkheid voor de recycling, behandeling en milieuvriendelijke te maken en de wederverkoper te waarschuwen. verwerking LET OP: het gebruik van een gasapparaat om te koken brengt EG VERORDENING nr. -
Pagina 59: Figure
Figure / Figures / Risunki / ∂ÈÎfiÓ˜/ Figures/Afbeeldingen = TRIPLA CORONA = AUSILIARIO = RAPIDO = SEMIRAPIDO = ULTRA-RAPID = AUXILIARY = RAPID = sEMI-RAPID skorostnaq malaq srednqq = ˘ÂÚÙ·¯‡˜ = ËÌÈÙ·¯‡˜ = ‚ÔËıËÙÈÎfi˜ = Ù·¯‡˜ = TRIPLE COURONNE = SEMIRAPIDE = AUXILIAIRE = RAPIDE = KROONBRANDER... - Pagina 60 Figure / Figures / Risunki / ∂ÈÎfiÓ˜/ Figures/Afbeeldingen 1,5 mm 2 mm 4 mm A =TERMOCOPPIA / THERMOCOUPLE / TERMOPARA / A =TERMOCOPPIA / THERMOCOUPLE / TERMOPARA / ı∂ƒª√™∆√πÃ∂π√À / THERMOCOUPLE / WARMTEKOPPEL ı∂ƒª√™∆√πÃ∂π√À / THERMOCOUPLE / WARMTEKOPPEL B =CANDELA / SPARK PLUG / SVEHA ZA"IGANIQ / ª¶√À∑π / B =CANDELA / SPARK PLUG / SVEHA ZA"IGANIQ / ª¶√À∑π...
- Pagina 61 Figure / Figures / Risunki / ∂ÈÎfiÓ˜/ Figures/Afbeeldingen • 13 - 58 TIMER STOP CONTAMINUTI FUNZIONAMENTO MANUALE MINUTE MINDER MANUAL USE TAJMER FUNKCIONIROVANIE V RUHNOM RE"IME Ã√¡√ª∂∆ƒ√ Ã∂πƒ√∫π¡∏∆∏ §∂π∆√Àƒ°π∞ MINUTEUR FONCTIONNEMENT MANUEL MINUTENTELLER HANDBEDIEND DURATA COTTURA FINE COTTURA COOKING DURATION END OF COOKING PRODOL"ITEL:NOST: OKONHANIE PRIGOTOVLENIQ...
- Pagina 64 Ed. 17/12/2010 334218...